Holiday Rules
This section enables the user to maintain different leave types for employees.
If you intend to report on and allow employees to book a holiday, then we need to know about your holiday year. This section enables you to set that detail.
We have created a holiday year for you which runs from 1st January to the 31st December. It has a standard of 20 days. If you want to change it, then just change the values on the screen. If you have more than one holiday type, you may want to create another.
Prerequisites
Rules and Guidelines
- Fields that are marked with red asterisks (*) are mandatory.
Field Information
Select from the dropdown the type of leave to be configured (e.g. Sick, Holiday).
Enter an alpha-numeric code that represents the leave type. Maximum of four characters can be entered.
Enter a description for the leave type (e.g. holiday/ sick/ unauthorised).
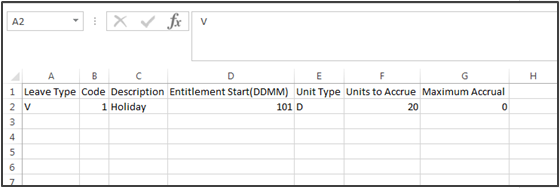
Enter the date ('DDMM' format) specifying the start of entitlement for the employees. This is the start day and month for the leave rule. This could be the 1st of January but it could be any other day of the year.
Select from the dropdown the unit type attached to the leave type which are typically in 'Days' but it still depends on how you record your leaves and absences.
Enter the number of units that the employee can accrue each year for the particular leave type (e.g. 20).
Enter the maximum number of entitled leave units that can be accrued when unused leaves are carried over to the following fiscal year.
This field is used when the application allows full accrual of leave that is not yet currently utilised.
Link
If you would rather import the data from a spreadsheet, you can download our template by selecting this link. If it is the first time you have added any data, then a dummy row will be displayed to help you. If you already have data, then that data will be downloaded to enable you to update it as well as add new data. You will need to remove the dummy data entered in the spreadsheet before import.
Although the file will open in Excel, it is important that it is saved as a CSV (Comma Separated Values) file. Otherwise, the import will not be completed.

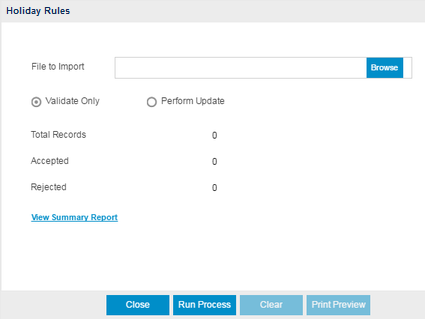
Upload will allow you to browse to the downloaded file and bring it in to the system.

You can either perform a validation or update the system once the file is located using the Browse option.
- Validate will advise you if you have any issue with the file before importing, enabling you to change the data. Select this option to test the format of the file and fields.
After running the Validate Only process, the system will produce a report detailing that the update is completed, and if there were errors encountered during the validation.
- Perform Update will upload the data and display it in the Holiday Rules page of the Wizard for you to confirm by moving Next. Select this option to upload and update information in your database.
Select Next >> to continue with the workflow or Select Back >> to return.
Click this link --> Setup Wizard if you want to go to the Wizard's Help.