Work
This section allows the user to set the information such as worked hours, work patterns, and other work-related data, some of which are needed for the HMRC and Real Time Information (RTI).
Prerequisites
Rules and Guidelines
- Fields that are marked with red asterisks (*) are mandatory.
Field Information
These fields display the employee's name.
This denotes at what rate the National Insurance is deducted for both employee and employer contributions.
Most employees over 21 are either 'A' or 'D'. To find out more about it, you may go to the HMRC Website.
Use the prompt to select from the valid options:
A - Not contracted out at full contribution rates (default).
B - Not contracted out at reduced contribution rates.
C - Not contracted out no employee contributions (employer's only) - For employees over pension age only.
H - Apprentice
J - Not contracted out deferred employee contributions.
M - Not contracted out under 21 years of age
X - No National Insurance contributions
Z - Not contracted out deferred employee under 21 years of age
In Setup Wizard, this is limited to accept only 'A' and 'M' table letters.
Note:
- When an employee's NI code is changed, the system will automatically store the previous code and contributions. Up to four changes per tax year can be accommodated in this way.
-
A warning that the apprenticeship is not eligible for NI rebate would appear when it is found that the apprentice date range is out of range in accordance with age.
-
NI Letter 'H' applies starting April 6, 2016. A Start date is required in order for the 'H' to operate.
- When an employee has no NI Letter, a default value is used. This value depends on the age and next pay date:
- Employee age is under 16 - X
- Employee age is between 16 and under 21 - M
- Employee age is above 21 - A
A warning message, "Default NI Table Letter inserted according to age - check and amend if necessary" is displayed on the Diagnostics Report so that a user may validate the values.
When a user enters a value that is not compatible with the employee's date of birth and ranges shown above, another warning message will be displayed on the Audit Report or Diagnostic Report saying, "NI Table letter not compatible with employee age."
- A validation is performed when NI Letter 'B' is used on this screen. When no validation is entered, the following message will be displayed, "Insufficient details for NI Code B, please click the NI Table Letter Validation button and supply that required information".
- A warning message "NI Category X applied - Employee is over 16 and has no Expat or Pensioner flag set - ensure correct use" is displayed in order to avoid issues caused by the incorrect use of 'X'. The correct reasons for the use of 'X' include:
- Employees under the age of 16
- Pensioner report
- Expat/EMP6
- Payment to a deceased worker (i.e. Leave Reason 99)
- CIS scheme payroll
- 'Drawing' payroll
- Expenses only payroll
If your employee has a National Insurance deferment notification, enter the date of the deferment.
- Deferment Category Table letters 'J' and 'Z' require a determent date in accordance with the Deferment Certificate expiry date (i,e. only valid for that tax year). When a valid date in the new tax year is not entered, or the expiry date has elapsed, the system will automatically default to the standard NI table category according to age:
- When the employee is an apprentice and 21 years or older, then 'A'.
- When the employee is an apprentice and under 25 years of age, then 'H'.
- When the employee is under 21 years of age but over 16, then 'M'.
Enter the date of the National Insurance deferment expiry date.
Enter the form name received from the HMRC.
This field tells the HMRC of an employee's normal working hours. Select from the dropdown list the hours that this employee will be working.
The valid options are:
- A - Up to 15.99 hours
- B - 16 to 23.99 hours
- C - 24 to 29.99 hours
- D - 30 hours or more
- E - Other
Check the days when the employee will be working.
Clicking the Edit button leads you to a window where you can set the Statutory Sick Pay (SSP) work pattern and the employee's actual work pattern.
- The SSP work pattern defines the days that are qualifying and none-qualifying work days for SSP Payments.
- The Work Pattern is the employee's normal work pattern (e.g. Monday to Friday).
- An employee may work overtime on a Saturday. Therefore, in a period of sickness, this day may be included in their qualifying days but is not part of their normal working hours.
This field displays the number of days per week the employee is eligible for SSP.
This field displays the number of contracted days.
This field allows you to select how you wish to receive your payslip. If 'Printed' or 'Both' is selected, there is an additional charge.
Choose one of the following:
- Global Use - The employee will receive the payslip as per the global setting in the payroll which will be part of the initial payroll implementation.
- Both - Printed and online payslips will be produced.
- Online - Only online payslips will be produced.
- Printed - Only a printed payslip will be produced.
Select the code from the dropdown for this field to specify how the payslip will be sent to the employee.
Choose one of the following:
- ENV - Enveloped payslip will be sent to the employee's home address.
- POST - Payslip will be sent to employee's home address.
- NONE - Payslip will be returned to employer.
Please contact
Link
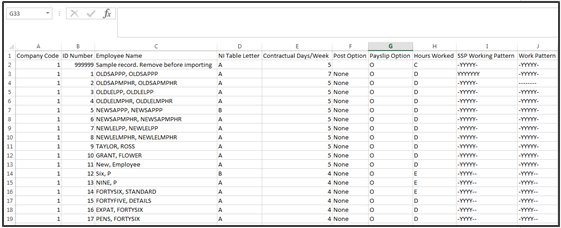
If you would rather import the data from a spreadsheet, you can download our template by selecting this link. If it is the first time you have added any data, then a dummy row will be displayed to help you. If you already have data, then that data will be downloaded to enable you to update it as well as add new data. You will need to remove the dummy data entered in the spreadsheet before import.
Although the file will open in Excel, it is important that it is saved as a CSV (Comma Separated Values) file. Otherwise, the import will not be completed.

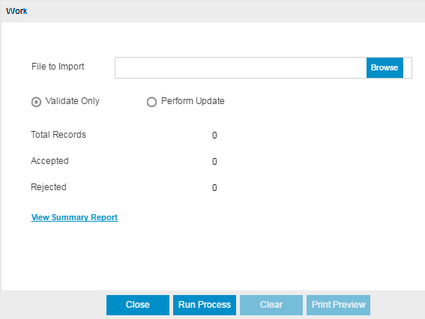
Upload will allow you to browse to the downloaded file and bring it in to the system.

You can either perform a validation or update the system once the file is located using the Browse option.
- Validate will advise you if you have any issue with the file before importing, enabling you to change the data. Select this option to test the format of the file and fields.
After running the Validate Only process, the system will produce a report detailing that the update is completed, and if there were errors encountered during the validation.
- Perform Update will upload the data and display it in the Work page of the Wizard for you to confirm by moving Next. Select this option to upload and update information in your database.
Select Next >> to continue with the workflow or Select Back >> to return.
Click this link --> Setup Wizard if you want to go to the Wizard's Help.