Employees
Employee details are required in the Wizard. The necessary data are broken down over several pages. This section deals with the Personal Details. This screen enables the user to add or update employee information.
Prerequisites
Rules and Guidelines
- Fields that are marked with red asterisks (*) are mandatory.
-
You may batch upload the information via the Upload link.
Field Information
This field displays the employee ID number.
Key in the employee's title or pick a title from the dropdown list.
The employee's surname must not contain spaces and can be up to a maximum of 24 characters.
The HMRC requires the surname for RTI purposes. If it has a hyphen, then please enter it here (e.g. Smythe-Simpson).
Enter the employee's given name.
Enter the employee's home address here. The 1st and 2nd line (Street and Town) of the address is mandatory for RTI purposes. Address Line 3 is optional.
This field defaults to UK. Use the prompt to select from the dropdown list.
Enter the post code associated with the UK addresses only. Leave blank for non-UK addresses.
Enter the employee's date of entry or start in the organisation. This is important for tax purposes and length of service.
This field displays the same entry as the Start Date. Users can override the field; however, the value that the use will input in the field should not be later than the Start Date.
This is the payroll company. The system allows more than one payroll company per customer.
Select which company you wish the employee to be in from the dropdown list.
This field displays current tax year leaver data, which is only used for implementation purposes.
Link
This link allows the user to download a .csv file with the fields listed on the screen, and obtain the format expected.
If you would rather import the data from a spreadsheet, you can download our template by selecting this link. If it is the first time you have added any data, then a dummy row will be displayed to help you. If you already have data, then that data will be downloaded to enable you to update it as well as add new data. You will need to remove the dummy data entered in the spreadsheet before import.
Although the file will open in Excel, it is important that it is saved as a CSV (Comma Separated Values) file. Otherwise, the import will not be completed.

This link allows the user to upload a .csv file, containing the employees, to be entered into the system. The data must be in the correct format to be uploaded successfully. Refer to the downloaded .csv file via the Download link for the required format.
For purposes of editing the downloaded file, the user must only use Notepad. If the file is edited by any other software, the file will be rejected.
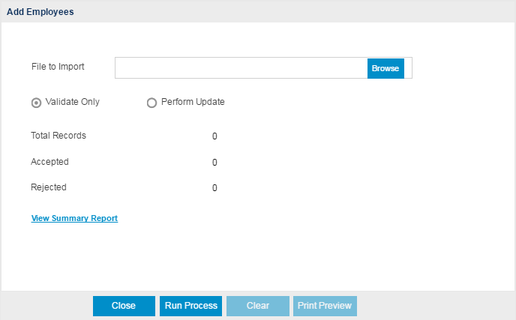
A pop-up will display the Mapper. Use the Browse button to locate your file from your local drive for upload.

You can either perform a validation or update the system once the file is located using the Browse option.
- Validate will advise you if you have any issue with the file before importing, enabling you to change the data. Select this option to test the format of the file and fields.
After running the Validate Only process, the system will produce a report detailing that the update is completed, and if there were errors encountered during the validation. The detailed information is shown in the Summary Report.
- Perform Update will upload the data and display it in the Employees page of the Wizard for you to confirm by moving Next. Select this option to upload and update information in your database.
Running the Perform Update process will produce both the Summary Report and the Exceptions File, detailing the errors/exceptions encountered during the upload.
Select Next >> to continue with the workflow.
Click this link --> Setup Wizard if you want to go to the Wizard's Help.